# Homelab

Guides/manuals for administrative tasks

# DevOps

# Bitwarden Secrets Manager on macOS

Run this command:

```
curl https://bws.bitwarden.com/install > bws.sh
```

<p class="callout danger">Review the downloaded script to make sure that it is safe to use</p>

# Comin Hard Reset

<p class="callout danger">Do not use git push --force on main, otherwise comin will not be able to recognize changes until it is reset</p>

```bash
# rm -rf /var/lib/comin
# systemctl restart comin
# cd /var/lib/comin/repository
# comin fetch
```

# NixOS

# New Host Checklist

### Provisioning

- [ ] Add terraform entry for VM, then run `terraform plan`, verify, and then `terraform apply`
- [ ] Follow nixOS provisioning steps

### NixOS Configuration

- [ ] Create/copy config folder for host with intended name in hosts i.e. hosts/hostname. Copy the default.nix template, and the hardware-configuration.nix file from the actual host after installation
- [ ] Add the systemd-boot bootloader config to hardware-configuration.nix for the host
- [ ] Generate SOPS/Age private key and paste to /var/lib/sops/age/keys.txt
- [ ] Generate SOPS/Age public key and paste to .sops.yaml, create separate config section
- [ ] If backups are needed for this host, create the borgmatic\_pass section with local and remote subkeys, generate passwords in secrets/{hostname}.yml 
    - [ ] This is the bare minimum configuration for the encrypted sops file: ```yaml
        borgmatic_pass:
          local: someStrongPassword
          remote: someOtherStrongPassword
        ```

### Manual Steps

- [ ] If borgmatic was configured, follow these steps below  
    
    - [ ] Add the ssh host's ssh host public key to the backup server's configuration
    - [ ] Copy the ssh host's ssh host public key to the rsyncnet authorized\_keys file, then push up to rsync.net account
    - [ ] Manually run the command `borgmatic -v 2` to get the unknown ssh host prompt to appear, select yes for both

# Sops-Nix Env Files

1. Create the plaintext env file to be used <p class="callout danger">Do not commit any plaintext env files into version control</p>
2. Run the command to encrypt the file: `sops --input-type binary --output-type binary -e [file]`
3. To edit the file, run the following code: `sops --input-type binary --output-type binary [file]`

# Sops-Nix Setup

To set up the system to run sops-nix, I usually use the host SSH key like so:

```bash
nix run 'nixpkgs#ssh-to-age' -- -private-key -i /etc/ssh/ssh_host_ed25519_key  
```

Copy the generated private key to `/var/lib/sops/age/keys.txt` . This is the location set in the sopsFile option in `base/secrets.nix`.

No need to change from root permissions.

Afterwards, generate the public key from the private key and then copy and paste this into the .sops.yaml config file on the nix config:

```
nix shell 'nixpkgs#age' -c age-keygen -y /var/lib/sops/age/keys.txt 
```

<p class="callout info">Don't forget to run a `sops updatekeys` command if you are performing these steps after the secrets file has been created</p>

# Provisioning a new nixOS Host

```shell
nix run nixos-anywhere -- --flake '.#dev-01' --generate-hardware-config nixos-generate-config ./hosts/dev-01/hardware-configuration.nix nixos@192.168.1.243
```

# home-manager setup

```
nix run home-manager -- --switch '.#<config>'
```

# /nix/store

#### List top storage users of files in the nix store

```bash
nix path-info -rS /run/current-system | sort -nk2 | tail -20 | numfmt --field=2 --to=iec --suffix=B
```

# PiKVM

# /boot/config.txt

### \[pi4\]

Used to fix kvmd-otg and kvmd-tc358743 not starting at boot

```yaml
dtoverlay=tc358743
dtoverlay=disable-bt
dtoverlay=dwc2,dr_mode=peripheral
```

# Tailscale Auto Cert Update Service

These systemd services allow me to update the Tailscale certificates for PiKVM every 80 days without manual intervention.

#### cert-update.timer

```bash
[Unit]
Description=Update tailscale certificates for nginx

[Timer]
OnBootSec=1min
OnUnitActiveSec=80d
AccuracySec=1h
Persistent=true

[Install]
WantedBy=timers.target
```

#### tailscale-cert-update.service

```bash
[Unit]
Description=Update tailscale certificates for nginx
After=network-online.target tailscaled.service

[Service]
Type=oneshot

# Service isolation
ProtectHome=true
ReadWritePaths=/etc/kvmd/nginx/ssl
PrivateNetwork=false
ProtectClock=true
ProtectHostname=true
ProtectKernelTunables=true
ProtectKernelModules=true
ProtectControlGroups=true
LockPersonality=true

# Execution steps
ExecStartPre=/usr/bin/curl --silent --max-time 10 --retry 5 https://hc.its-et.me/ping/PlGPBqq-0rLI4N4ya3jYmg/pve-01k-certificate-update/start
ExecStartPre=/usr/bin/rw
ExecStart=tailscale cert --cert-file=/etc/kvmd/nginx/ssl/server.crt --key-file=/etc/kvmd/nginx/ssl/server.key pve-01k.tail755c5.ts.net
ExecStartPost=/usr/bin/curl --silent --max-time 10 --retry 5 https://hc.its-et.me/ping/PlGPBqq-0rLI4N4ya3jYmg/pve-01k-certificate-update
ExecStartPost=/usr/bin/systemctl restart kvmd-nginx.service
ExecStartPost=/usr/bin/ro

[Install]
WantedBy=default.target
```

<p class="callout info">Don't use PrivateDevices= in \[Service\], this disallows /usr/bin/ro and /usr/bin/rw from executing properly</p>

# Procedures

# Service Decommissioning Checlist

### Purpose

This checklist is to ensure that all aspects of an active service are decommissioned properly, completely, and in the correct order to prevent potential failures elsewhere in the system.

### Steps

- [ ] Determine which monitoring systems need to be disabled, permanently and temporarily to prevent service outage notifications
- [ ] If this service has a MariaDB, PostgreSQL or otherwise database, remove its entry from the nixOS borgmatic config to prevent backup failure
- [ ] If this service is running in a Docker container, tear down its compose project. Otherwise stop the service and disable/remove its nixOS config. Push configuration change to `staging` branch

<p class="callout warning">Do not push this change to `main` until testing that the configuration builds successfully</p>

<p class="callout info">If this service is a docker-compose project, move its folder to ~/Containers/.retired-services</p>

- [ ] If this service is publicly exposed with a TLS cert, remove its entry from traefik's `acme.json` file to prevent unwanted cert renewals
- [ ] If remaining data is unwanted, clear all relevant files from the filesystem i.e. `/srv/<servicename>` and any relevant databases and secrets
- [ ] Push changes from `staging` to `main`
- [ ] If any related monitoring systems were temporarily put into maintenance mode, re-enable them in Uptime Kuma and Healthchecks

### Vikunja Copy-Paste Version

- [ ] Shutdown/disable needed monitoring services
- [ ] Remove/disable borgmatic database backup entry from nixOS to prevent borgmatic failure
- [ ] Teardown compose project/remove nixOS service config, push change to `staging`
    - [ ] If docker-compose project, move to ~/Containers/.retired-services
- [ ] Remove service's entry from traefik's `acme.json` file to prevent unwanted cert renewals
- [ ] If unneeded, clear all remaining files from the filesystem i.e. `/srv/<servicename>` and any relevant databases and secrets
- [ ] Push changes from `staging` to `main`
- [ ] Re-enable monitoring systems as needed

# Service Provisioning Checlist

### Purpose

This checklist is to ensure that all aspects of a new service are provisioned properly, completely, and in the correct order to prevent potential failures elsewhere in the system.

### Steps

- [ ] Determine any potential impact to any other services; see things to look out for below 
    - [ ] Is this service going to be running on app-01 or a different host?
    - [ ] Is it going to utilize SSO auth?
    - [ ] Is it going to need a database? Service files folder in /mnt/data/services on app-01?
    - [ ] Is it going to need any other secrets?
    - [ ] Does this service need to be monitored?
    - [ ] Does this service's data need to be backed up?
    - [ ] Exposed to the public internet?
    - [ ] Send pings to HealthChecks?
    - [ ] Utilizing a mailserver or ntfy to send notifications?
- [ ] Determine the most feasible deployment method 
    - [ ] Docker container
    - [ ] nixOS module (preferred for reproducibility and programmatic configuration)

<p class="callout warning">Check on repology.org to verify if the nixOS module is up to date with upstream before choosing to use the nixOS module</p>

- [ ] If the service uses a database 
    - [ ] Typically, I create databases whose names are the same as the service name e.g. for forgejo, the database name is forgejo
    - [ ] Create and store database secrets under Bitwarden Secrets Manager, using the following naming convention: `webservices.<service name>.db_pass`
    - [ ] Create a new branch in `Projects/ansible` from staging using the naming convention *databases.&lt;service name&gt;*
    - [ ] Add an entry under the appropriate database server's `host_vars` file. Run the appropriate playbook to auto-provision that database
- [ ] If this service needs a folder in the filesystem, create that respective folder under /mnt/data/services and create a symlink to it from /srv such that the symlink's location is /srv/&lt;service name&gt;
- [ ] If this service is being provisioned using Docker 
    - [ ] Follow Docker service provisioning procedure to create a docker-compose file and appropriate config and .env files
- [ ] If this service is being provisioned using a nixOS module 
    - [ ] Write wrapper module as needed
    - [ ] Add the database secrets to the SOPS config. This will be used for both database access and borgmatic backups
    - [ ] Add a SOPS secrets config block to the host config running the service and pass to the module to prevent the secret being exposed in the store
- [ ] If this service needs to send pings to HealthChecks 
    - [ ] Create a ping in the HealthChecks service
    - [ ] Configure the service to contact the specific endpoint provisioned with the check
- [ ] If this service needs to send notifications using ntfy 
    - [ ] Create a channel if needed and set permissions
    - [ ] Create a token with the appropriate permissions, save it to SOPS if needed
    - [ ] Configure the service with the token
- [ ] If this service needs to send email notifications 
    - [ ] Configure the email server and run a test using the SMTP relay credentials
- [ ] If this service has metrics that need to be scraped 
    - [ ] Set a port that the grafana-alloy collector can poll
    - [ ] Add an alloy configuration under the service's module
- [ ] If this service needs to be monitored for uptime 
    - [ ] Determine if this service has a specific health/up monitoring endpoint
    - [ ] Add a check for uptime-kuma but do not engage yet
- [ ] Test service on a separate testing VM if needed
- [ ] When the service is ready to deploy, push to `staging`
- [ ] Test that the nixOS config builds and starts successfully, or the docker-compose project starts normally
- [ ] Enable uptime-kuma service monitor

### Vikunja Copy-Paste Version

# Service Database Decommissioning Checlist

### Purpose

This checklist is to ensure that all steps are taken to ensure that deleting a service database does not cause any disruption in other parts of the infrastructure.

### Steps

- [ ] Determine any potential impact to any other services; see things to look out for below 
    - [ ] Are any services dependent on this database, directly or indirectly?
    - [ ] Is the database backed up? 
        - [ ] Is there a specific borg repo for this database?

<p class="callout warning">Ensure this database's entry is deleted for borgmatic, otherwise the auto backup service will error out</p>

- [ ] Delete the database's entry from nixOS, on the dbserver's default.nix config 
    - [ ] Delete the database's secrets from sops-nix
    - [ ] Delete the name of the database if it is being backed up with the `borg-config` module
    - [ ] Push these changes to prod before continuing with the following steps
- [ ] Delete the database's entry from ansible 
    - [ ] Delete the database's secrets from any SOPS files they may be stored in
    - [ ] Delete the database's entry from ansible, on the dbserver's host\_vars config
- [ ] Ensure that the database's secrets are deleted everywhere 
    - [ ] Delete database secrets from Bitwarden Secrets Manager after 1 year in the event that access is needed again
    - [ ] Delete entries of the database from any host\_vars files in ansible, to stop it from re-provisioning
- [ ] `DROP` the database from the db server it resides on

# Proxmox

# Fix Intel Ethernet NIC Hang

### Problem

If ethernet hangs and you get this journal log:

```
Mar 29 05:14:04 pve-01 kernel: e1000e 0000:00:1f.6 enp0s31f6: Detected Hardware Unit Hang:
                                 TDH                  <3>
                                 TDT                  <75>
                                 next_to_use          <75>
                                 next_to_clean        <2>
                               buffer_info[next_to_clean]:
                                 time_stamp           <1525c7e78>
                                 next_to_watch        <3>
                                 jiffies              <15287e140>
                                 next_to_watch.status <0>
                               MAC Status             <40080083>
                               PHY Status             <796d>
                               PHY 1000BASE-T Status  <3800>
                               PHY Extended Status    <3000>
                               PCI Status             <10>

```

Symptoms: unable to connect to internet, node becomes remotely inaccessible

### Solution

Edit `/etc/network/interfaces` with the following:

```
iface vmbr0 inet static
        ...
        post-up ethtool -K <ethernet device> gso off gro off tso off tx off rx off
        ...

source /etc/network/interfaces.d/*
```

<p class="callout info">Make sure the ethtool package is installed on the system</p>

**Sources:**

[https://forum.proxmox.com/threads/intel-nic-e1000e-hardware-unit-hang.106001/](https://forum.proxmox.com/threads/intel-nic-e1000e-hardware-unit-hang.106001/)

[https://www.reddit.com/r/Proxmox/comments/1drs89s/intel\_nic\_e1000e\_hardware\_unit\_hang/](https://www.reddit.com/r/Proxmox/comments/1drs89s/intel_nic_e1000e_hardware_unit_hang/)

# Import a qcow2 file

```bash
qm importdisk <vm_id> file.qcow2 <storage-backend>
```

# Rename a node

```bash
#!/usr/bin/bash

mkdir -p /tmp/qemu ## make temp dir for moving VM config files
cp /etc/pve/nodes/$original_hostname/qemu-server/* /tmp/qemu/

hostnamectl set-hostname "$new_hostname"
sed -i "s/$original_hostname/$new_hostname/g" /etc/hosts

services=("pveproxy.service" "pvebanner.service" "pve-cluster.service" "pvestatd.service" "pvedaemon.service")
for service in "${services[@]}"
do
systemctl restart "$service"
done

rm -rf "/etc/pve/nodes/$original_hostname"
cp /tmp/qemu/* /etc/pve/nodes/$new_hostname/qemu-server/
rm /tmp/qemu/*
```

Copy the contents of <tt>/var/lib/rrdcached/db/pve2-{node,storage}/*old-hostname*</tt> to <tt>/var/lib/rrdcached/db/pve2-{node,storage}/*new-hostname*</tt> and remove the old directory.

# User Provisioning

Perform these following steps:

```bash
pveum useradd etorres@pam
pveum group add wheel -comment 'System admins'
pveum acl modify / -group wheel -role Administrator
pveum acl modify / -group wheel -role PVEAdmin
pveum acl modify / -group wheel -role PVEVMAdmin
pveum group modify wheel -privs Sys.PowerMgmt VM.PowerMgmt Permissions.M
pveum usermod etorres@pam -group wheel
```

# Terraform Setup

## Creating the Terraform role in PVE

```
# pveum user add terraform@pve

# pveum role add Terraform -privs "Realm.AllocateUser, VM.PowerMgmt, VM.GuestAgent.Unrestricted, Sys.Console, Sys.Audit,   Sys.AccessNetwork, VM.Config.Cloudinit, VM.Replicate, Pool.Allocate, SDN.Audit, Realm.Allocate, SDN.Use, Mapping.Modify, VM.Config.Memory, VM.GuestAgent.FileSystemMgmt, VM.Allocate, SDN.Allocate, VM.Console, VM.Clone, VM.Backup, Datastore.AllocateTemplate, VM.Snapshot, VM.Config.Network, Sys.Incoming, Sys.Modify, VM.Snapshot.Rollback, VM.Config.Disk, Datastore.Allocate, VM.Config.CPU, VM.Config.CDROM, Group.Allocate, Datastore.Audit, VM.Migrate, VM.GuestAgent.FileWrite, Mapping.Use, Datastore.AllocateSpace, Sys.Syslog, VM.Config.Options, Pool.Audit, User.Modify, VM.Config.HWType, VM.Audit, Sys.PowerMgmt, VM.GuestAgent.Audit, Mapping.Audit, VM.GuestAgent.FileRead, Permissions.Modify"

# pveum aclmod / -user terraform@pve -role Terraform

# pveum user token add terraform@pve <TokenName> --privsep=0
```

```
provider "proxmox" {
  endpoint  = var.virtual_environment_endpoint
  api_token = "terraform@pve!<TokenName>=xxxxxxxx-xxxx-xxxx-xxxx-xxxxxxxxxxxx"
  insecure  = true
  #ssh {
  #  agent    = true
  #  username = "terraform"
  #}
}
```

# /etc/network/interfaces

```
# network interface settings; autogenerated
# Please do NOT modify this file directly, unless you know what
# you're doing.
#
# If you want to manage parts of the network configuration manually,
# please utilize the 'source' or 'source-directory' directives to do
# so.
# PVE will preserve these directives, but will NOT read its network
# configuration from sourced files, so do not attempt to move any of
# the PVE managed interfaces into external files!

auto lo
iface lo inet loopback

auto <eth-interface>
iface <eth-interface> inet manual

auto vmbr0
iface vmbr0 inet manual
        bridge-ports <eth-interface>
        bridge-stp off
        bridge-fd 0
        bridge-vlan-aware yes
        bridge-vids 2-4094
        post-up   ethtool -K <eth-interface> gso off gro off tso off tx off rx off
        post-up   echo 1 > /proc/sys/net/ipv4/ip_forward
        post-up   iptables -t nat -A POSTROUTING -s '192.168.1.1/24' -o <eth-interface> -j MASQUERADE
        post-down iptables -t nat -D POSTROUTING -s '192.168.1.1/24' -o <eth-interface> -j MASQUERADE
        post-up   iptables -t raw -I PREROUTING -i fwbr+ -j CT --zone 1
        post-down iptables -t raw -D PREROUTING -i fwbr+ -j CT --zone 1

auto vmbr0.2
iface vmbr0.2 inet manual
#VLAN 2 Servers

auto vmbr0.3
iface vmbr0.3 inet manual
#VLAN 3 IoT

auto vmbr0.100
iface vmbr0.100 inet static
        address <pve-host-ip>/24
        gateway <management-network-gateway>
# VLAN 100 Management

source /etc/network/interfaces.d/*
```

# SELinux

Guides and reference for my SELinux configurations

# Policy - systemd-resolved

# Services

Guides and documentation for miscellaneous services that don't categorize under system.

# Authentik


# CUPS

Firewall rules:

[![image.png](https://kb.its-et.me/uploads/images/gallery/2025-04/scaled-1680-/Dzs9a8pqbepuyIme-image.png)](https://kb.its-et.me/uploads/images/gallery/2025-04/Dzs9a8pqbepuyIme-image.png)

# Docker Healthchecks

## Rationale

Use these to verify the health of database containers. This allows me to only run web services when a database is healthy. This prevents us from hiding a silent failure.

## MariaDB

```yaml
healthcheck:
  test: ["CMD", "healthcheck.sh", "--connect", "--innodb_initialized"]
  start_period: 10s
  interval: 10s
  timeout: 5s
  retries: 3
```

## MySQL

```
healthcheck:
  test: ["CMD", "mysqladmin" ,"ping", "-h", "localhost"]
  timeout: 20s
  retries: 10
```

## Postgres

```yaml
healthcheck:
  test: ["CMD", "pg_isready", "-U", "<user>"]
  interval: 30s
  timeout: 20s
  retries: 3    
```

## Web Services

```yaml
healthcheck:
  test: ["CMD-SHELL", "curl -f http://localhost:3000/api/healthz | grep pass"]
  interval: 1m
  timeout: 2m
  retries: 5
   
```

If the service has an HTTP endpoint and has the curl binary, use the above to create a healthcheck.

<p class="callout info">Use CMD-SHELL as the first token to be able to pipe output from curl to grep</p>

## Valkey

```yaml
healthcheck:
  test: ["CMD-SHELL", "valkey-cli ping | grep PONG"]
  start_period: 20s
  interval: 30s
  retries: 5
  timeout: 3s
```

# docker-socket-proxy

Use this service to expose the docker socket and protect it from unauthorized operations

Prevent

### Required Permissions

#### authentik

- CONTAINERS
- IMAGES

#### uptime-kuma

#### traefik

# How to upgrade MariaDB inside Docker

<span style="font-family: monospace;"><span style="color: #000000; background-color: #ffffff;">docker compose exec -it db bash -c "mariadb-upgrade -u root -p"</span>  
</span>

<span style="font-family: monospace;">Then enter password</span>

# Samba/SMB

## Configuration

My user is set up in unix groups that correspond to the groups outlined in the following config sections and added in the groups `paperless` and `timemachine`.

## Paperless-ngx Consumer Share

```
[paperlessngx-consumer]
comment = Paperless-ngx Consumption Directory
path = /path/to/consumer/directory
# Make this share accessible to all users in the paperless group
valid users = @paperless
write list = @paperless
public = no
writable = yes
printable = no
```

## Time Machine Share

```shell
[krypton-timemachine]
comment = Time machine backup share
path = /path/to/time/machine/backups
# Make this share accessible to all users in the timemachine group
valid users = @timemachine
write list = @timemachine
public = no
writable = yes
printable = no
```

# searx-ng

HTTP method: use GET to be able to use the back button on websites

# Syncthing


# Troubleshooting

## Django

### CSRF verification failed: null does not match any trusted origins

If a django-backed service is sitting behind a reverse proxy, ensure that for referrer policy header, it is passing 'same-origin'.

For example, in traefik's file provider:

```yaml
headers-middleware:
  headers:
    referrerPolicy: same-origin
```

# System

How to administer core system services such as networking, storage, monitoring, etc.

# audit

Kernel Parameters:

```ini
audit=1 audit_backlog_limit=8192
```

This prevents the message

```shell
kauditd: hold queue overflow
```

# crypttab

This configuration allows us to automatically unlock but not mount external drives. For example:

```
/etc/crypttab
diskn          UUID=<path to disk by /dev/disk/by-uuid>    /etc/keyfiles/<keyfile name>  luks,nofail
```

This configuration will use the keyfile /etc/keyfiles/keyfile to /dev/disk/by-uuid/id and create a device node for that disk at /dev/mapper/diskn for mounting in fstab.

<p class="callout warning">Do not directly mount the disk</p>

# Docker Firewall Configuration

**Source:** [Firewalld Strict Docker Filtering](https://firewalld.org/2024/04/strictly-filtering-docker-containers "Firewalld Project Blog")

## Preparation

Required parts:

Install firewalld and activate service:

```bash
pacman -Syu firewalld
systemctl enable --now firewalld.service
```

Disable any other firewall services.

Disable iptables for docker by adding or changing `/etc/docker/daemon.json` by adding the following config options:

```json
{
  "iptables": false
}
```

After changing this config file, restart the Docker daemon to apply the previous change:

```bash
systemctl restart docker.service
```

<p class="callout info">As a result of the previous steps, only allowed ports on firewalld are accessible from the outside. However containers are now unable to connect outbound to the internet.</p>

### firewalld Configuration

### Allow internet access for Docker containers

We need to allow masquerading to allow traffic from the Docker zone to the internet:

```bash
# Running this command allows your containers to reach out to the internet
firewall-cmd --permanent --zone=home --add-masquerade
# Since we used the --permanent flag, we need to reload the firewall for the changes to take effect
firewall-cmd --reload
```

<p class="callout info">Docker creates a zone in firewalld specifically for its bridge network interfaces for each container network along with the docker0 interface.</p>

To fix networking for containers that are not connected to a docker network, add your network interface connected to the network to the masqueraded zone.

# FiOS Router

## Set Router to Bridge Mode

Login to router administration interface

Select "My Network" on the top bar

[![image.png](https://kb.its-et.me/uploads/images/gallery/2024-07/scaled-1680-/eB1p4QLOZ73NhWAe-image.png)](https://wiki.its-et.me/uploads/images/gallery/2024-07/eB1p4QLOZ73NhWAe-image.png)

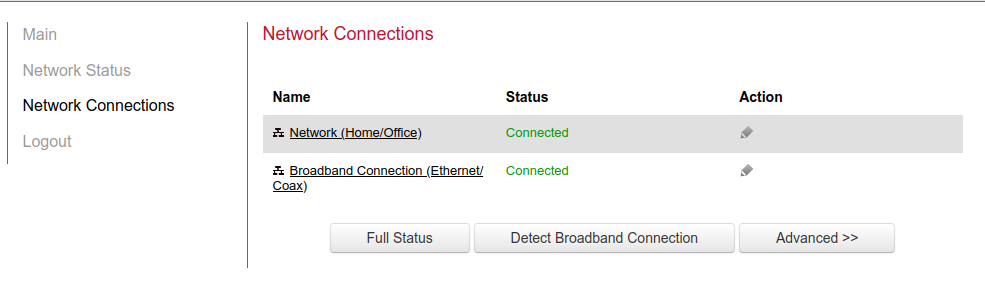
Select "Network Connections" &gt; "Advanced"

[![image.png](https://kb.its-et.me/uploads/images/gallery/2024-07/scaled-1680-/qwfdCts3E1doZEQv-image.png)](https://wiki.its-et.me/uploads/images/gallery/2024-07/qwfdCts3E1doZEQv-image.png)

Select edit icon for "Network (Home/Office)", then click "Settings" on the bottom right

[![image.png](https://kb.its-et.me/uploads/images/gallery/2024-07/scaled-1680-/dyp39tKQkKqvVMt7-image.png)](https://wiki.its-et.me/uploads/images/gallery/2024-07/dyp39tKQkKqvVMt7-image.png)
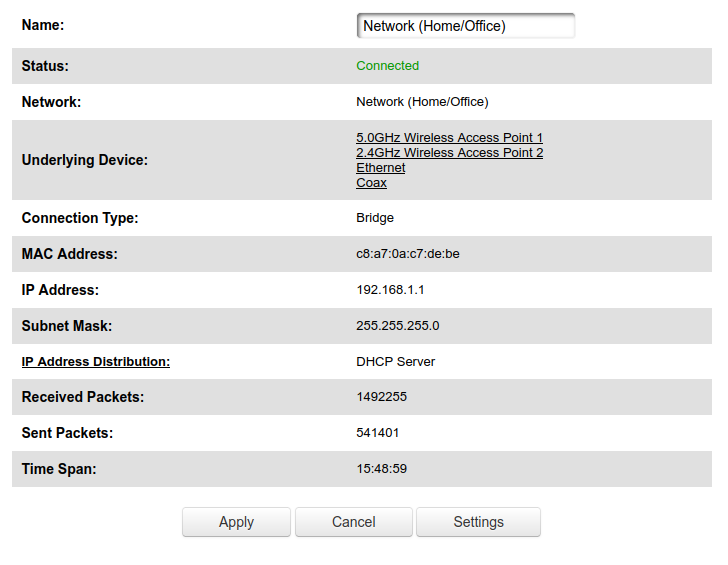
Check the box for bridge mode under the "Bridge" section

<p class="callout info">If you set up another router and it detects that the ISP modem/router is still active, it will use the 10.0.0.0/16 network rather than the 192.168.0.0/24 network</p>

---

## Configure IP Allocation

Login to router administration interface

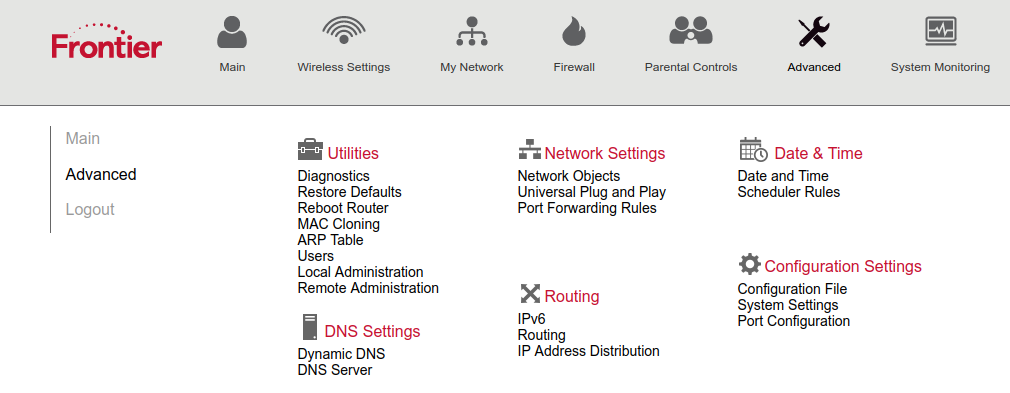
Select "Advanced" on the top bar, then select "Yes"

[![image.png](https://kb.its-et.me/uploads/images/gallery/2024-07/scaled-1680-/eB1p4QLOZ73NhWAe-image.png)](https://wiki.its-et.me/uploads/images/gallery/2024-07/eB1p4QLOZ73NhWAe-image.png)

Under "Routing", select "IP Address Distribution"

[![image.png](https://kb.its-et.me/uploads/images/gallery/2024-07/scaled-1680-/iif79S8yrhl5F873-image.png)](https://wiki.its-et.me/uploads/images/gallery/2024-07/iif79S8yrhl5F873-image.png)
Select "Connection List" on the bottom

[![image.png](https://kb.its-et.me/uploads/images/gallery/2024-07/scaled-1680-/ki8zC9l5cMLLNx6a-image.png)](https://wiki.its-et.me/uploads/images/gallery/2024-07/ki8zC9l5cMLLNx6a-image.png)
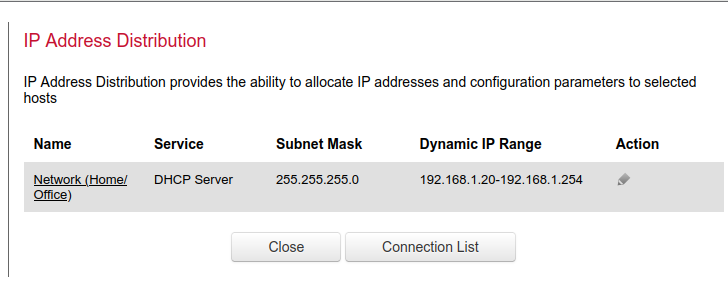
Edit a specific host's IP allocation

# Grafana Alloy

How to get WAL stats for alloy:

```
alloy tools prometheus.remote_write wal-stats /var/lib/private/alloy/data-alloy/prometheus.remote_write.default/wal

```

# Intel NIC Configuration

## Wireless Configuration

```
# iwlwifi.conf
# Enable antenna aggregation
options iwlwifi 11n_disable=8

```

# lm-sensors

<table border="1" id="bkmrk-label-value-cputin-m" style="border-collapse: collapse; width: 100%;"><colgroup><col style="width: 50%;"></col><col style="width: 50%;"></col></colgroup><tbody><tr><td>Label  
</td><td>Value  
</td></tr><tr><td>CPUTIN  
</td><td>Motherboard's CPU temp sensor  
</td></tr><tr><td>SYSTIN  
</td><td>Motherboard temp sensor  
</td></tr><tr><td>AUXTIN  
</td><td>Aux temp sensors, usually for PSU</td></tr></tbody></table>

# LUKS

https://wiki.archlinux.org/title/Dm-crypt/Specialties#Disable\_workqueue\_for\_increased\_solid\_state\_drive\_(SSD)\_performance

# traefik

## Docker Label Configuration

#### Base Labels  


This is the minimum set of labels you need to expose a container to traefik:

```yaml
labels:
	traefik.enable: true
	traefik.http.routers.<service_name>.entrypoints: <ep1>, <ep2>
	traefik.http.routers.<service_name>.rule: Host(`host1`, `host2`)
	traefik.http.routers.<service_name>.tls: true
	traefik.http.routers.<service_name>.tls.certresolver: <cert_resolver>
```

#### Middleware configuration  


To configure a middleware for a particular service, add the following label:

```yaml
traefik.http.routers.<service_name>.middlewares: middlware@provider
```

#### Accessing on a non-default port  


If a container exposes multiple ports or a non-default port:

```yaml
traefik.http.services.<service_name>.loadbalancer.server.port: <port_num>
```

## Networking

To expose only containers on a certain network to traefik, you must specify the providers.docker.network option as so:

```yaml
providers:
	docker:
    	endpoint:
        exposedByDefault: false # Require label in docker-compose file for each container
        network: <net_name>
        watch: true

```

<p class="callout info">If traefik itself is running in a docker container, you must place it on the same network as the containers you want to expose.</p>

## TLS

Basic TLS configuration that enables resolvers for both single-domain and wildcard Let's Encrypt certificates, as well as staging certificates:

```yaml
# ========== TLS Configuration ==========
tls:
	# Disable TLS version 1.0 and 1.1
    options:
		default:
 			minVersion: VersionTLS12
 			sniStrict: true
 
	certificatesResolvers:
		staging:
			acme:
				email: "email@email.com"
				storage: /etc/traefik/certs/acme.json
				caServer: "https://acme-staging-v02.api.letsencrypt.org/directory"
				tlsChallenge: {}

		production:
			acme:
				email: "email@email.com"
				storage: /etc/traefik/certs/acme.json
				caServer: "https://acme-v02.api.letsencrypt.org/directory"
				tlsChallenge: {}

```

<p class="callout info">Wildcard certificates can only be obtained with the DNS-01 challenge. Therefore a resolver that uses these must have dnsChallenge configured accordingly.</p>

## Tailscale

When running traefik in a docker container, ensure that it has access to the tailscale socket to be able to issue TLS certificates through tailscale

# Users/Groups

## krypton

<table border="1" id="bkmrk-user-group-type-%28log" style="border-collapse: collapse; width: 100%;"><colgroup><col style="width: 16.666667%;"></col><col style="width: 16.666667%;"></col><col style="width: 33.333333%;"></col><col style="width: 33.333333%;"></col></colgroup><tbody><tr><td>User</td><td>Group</td><td>Type (login/system)</td><td>Purpose</td></tr><tr><td>restic</td><td>backup</td><td>system</td><td>Run the restic-rest-server</td></tr><tr><td>www-srv</td><td>www</td><td>system</td><td>Run web-accessible services </td></tr><tr><td>-</td><td>timemachine</td><td>  
</td><td>  
</td></tr><tr><td>traefik</td><td>traefik</td><td>system</td><td>Run the t

</td></tr><tr><td>  
</td><td>syncthing</td><td>  
</td><td></td></tr><tr><td>  
</td><td>paperless</td><td>  
</td><td></td></tr><tr><td>  
</td><td>docker</td><td>  
</td><td></td></tr><tr><td>  
</td><td>users</td><td>  
</td><td></td></tr><tr><td>  
</td><td>wheel</td><td>  
</td><td></td></tr></tbody></table>

## oxygen

<table border="1" id="bkmrk-" style="border-collapse: collapse; width: 100%;"><colgroup><col style="width: 24.938272%;"></col><col style="width: 24.938272%;"></col><col style="width: 24.938272%;"></col><col style="width: 24.938272%;"></col></colgroup><tbody><tr><td>  
</td><td>  
</td><td>  
</td><td>  
</td></tr><tr><td>  
</td><td>  
</td><td>  
</td><td>  
</td></tr><tr><td>  
</td><td>  
</td><td>  
</td><td>  
</td></tr><tr><td>  
</td><td>  
</td><td>  
</td><td>  
</td></tr></tbody></table>